こんにちは、やまだたいし( https://twitter.com/OrotiYamatano )です。
本記事はUnityゲーム開発者ギルド Advent Calendar 2023の14日目の記事です。
前日はまんたあにどさんによる「2023年を振り返る」でした。
いくつもイラストを投稿されていて、見栄えのする記事でしたね。
今日30歳になってしまったおっさんには新社会人が眩しい……。
目次
UnityのGizmosについて
UnityのGizmosについての記事が少なかったので今回は本記事を作成することにしました。
そもそもGizmosとは

Unity上に表示されるこういったアイコンや、線のことをGizmos(ギズモ)とよびます。
なぜGizmosを使うのか
デバッグ機能であればプリプロセッサディレクティブ(#if UNITY_EDITOR )を使うことでデバック機能として使うことも出来ます。
しかし、あえてGizmosを使うメリットもあります。
・メモリを使わない
まずスクリプトとしてアタッチされる場合少なくとも少しメモリを使います。
メモリを使わずに済みます。
・表示非表示が楽
Unity標準機能でGizmosの表示非表示オプションがあるため明確に表示非表示を切り替えることが可能です。
・明確に本番には乗らない
デバッグ機能をつくってうっかり乗ってしまうこともあると思うがGizmosはそもそもdrowgizmosが本番では走らないため乗ることがない。
どのような機能があるのか
まずどのような表示があるかの前にGizmosには表示するためのメソッドが2つある
OnDrawGizmos と OnDrawGizmosSelected だ。
UnityのオプションでGizmosを表示設定にしているなら常に描画するのがOnDrawGizmos
選択したオブジェクトだけ表示するのが OnDrawGizmosSelected となっている。
Gizmos.DrawCube
public class DrawCube : MonoBehaviour
{
    void OnDrawGizmos()
    {
        Gizmos.color = new Color(1, 0, 0, 0.5f);
        Gizmos.DrawCube(transform.position, new Vector3(1, 1, 1));
    }
}
 キューブを描画する。
様々な色はもちろんGizmosとして描画出来る。
Gizmos.DrawFrustum
public class DrawFrustum : MonoBehaviour
{
    void OnDrawGizmos()
    {
        Gizmos.DrawFrustum(transform.position, 60f, 100, 1, 0.6f);
    }
}
 視錐台の表示。
私は使ったことがないがcinemasceneあたりの機能を作るときに便利そう。
Gizmos.DrawGUITexture
public class DrawGUITexture : MonoBehaviour
{
    public Texture myTexture;
    void OnDrawGizmos()
    {
        Gizmos.DrawGUITexture(new Rect(10, 10, 200, -200), myTexture);
    }
}

画像の表示
Gizmos.DrawIcon
public class DrawIcon : MonoBehaviour
{
    void OnDrawGizmos()
    {
        Gizmos.DrawIcon(transform.position, "AvatarInspector/RightHandZoomSilhouette", true);
    }
}

ギズモアイコンが表示できる。
Assets/Gizmosフォルダーに画像を格納することでオリジナルのアイコンも設定可能。
ちなみにUnityのIconはプログラム上から指定が可能。 github.com
allowScalingがTureになっていると距離に応じて拡縮するようになる。
消える距離が出てくるので注意が必要そうだ。
Gizmos.DrawLine
public class DrawLine : MonoBehaviour
{
    public Transform target;

    void OnDrawGizmos()
    {
        if (target != null)
        {
            Gizmos.color = Color.blue;
            Gizmos.DrawLine(transform.position, target.position);
        }
    }
}

線の描画
Gizmos.DrawLineList
public class DrawLineList : MonoBehaviour
{
    public Vector3[] points;

    void OnDrawGizmos()
    {
        Gizmos.color = Color.red;
        Gizmos.DrawLineList(points);
    }
}

複数の線の描画
Gizmos.DrawLineStrip
public class DrawLineStrip : MonoBehaviour
{
    public Vector3[] points;
    void OnDrawGizmos()
    {
        Gizmos.color = Color.green;
        Gizmos.DrawLineStrip(points, true);
    }
}
 2023.1から追加されたらしい
これも線の描画で、全ての点を結ぶような線が作れる
Gizmos.DrawMesh
public class DrawMesh : MonoBehaviour
{
    public SkinnedMeshRenderer model;
    void OnDrawGizmos()
    {
        Gizmos.color = Color.green;
        Gizmos.DrawMesh(model.sharedMesh);
    }
}
 Meshの描画。
指定するMeshならなんでも。
扇形のポリゴンを生成してエネミーの視覚範囲を描画したり、目印として役立ちそう。
Gizmos.DrawRay
public class DrawRay : MonoBehaviour
{
    void OnDrawGizmos()
    {
        Gizmos.color = Color.red;
        Vector3 direction = transform.TransformDirection(Vector3.forward) * 5;
        Gizmos.DrawRay(transform.position, direction);
    }
}

レイの表示。
ゲームでRayを飛ばすことは少なくないと思うがどこで詰まっているのかわからなくなることもある。
可視化に便利。
Gizmos.DrawSphere
public class DrawSphere : MonoBehaviour
{
    void OnDrawGizmos()
    {
        Gizmos.color = Color.yellow;
        Gizmos.DrawSphere(transform.position, 1);
    }
}
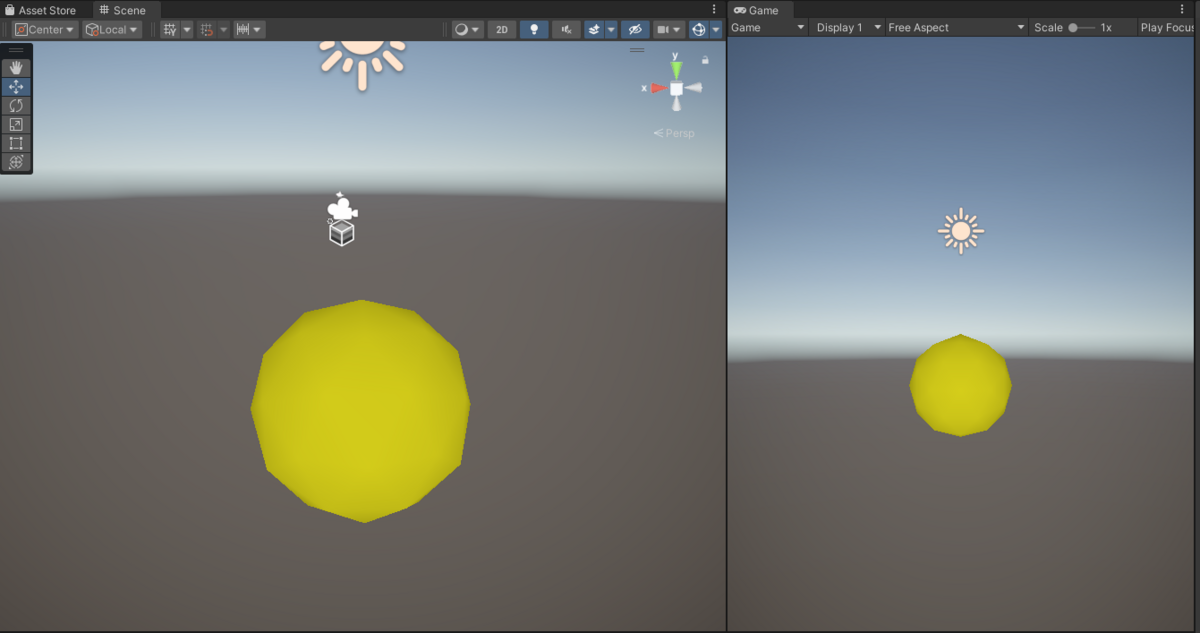 球体の表示
球体の表示
Gizmos.DrawWireCube
public class DrawWireCube : MonoBehaviour
{
    void OnDrawGizmos()
    {
        Gizmos.color = new Color(1, 0, 0, 0.5f);
        Gizmos.DrawWireCube(transform.position, new Vector3(1, 1, 1));
    }
}

ワイヤーのキューブの表示
Gizmos.DrawWireMesh
public class DrawWireMesh : MonoBehaviour
{
    public SkinnedMeshRenderer model;
    void OnDrawGizmos()
    {
        Gizmos.color = Color.green;
        Gizmos.DrawWireMesh(model.sharedMesh);
    }
}

ワイヤーのメッシュの表示
Gizmos.DrawWireSphere
public class DrawWireSphere : MonoBehaviour
{
    void OnDrawGizmos()
    {
        Gizmos.color = Color.yellow;
        Gizmos.DrawWireSphere(transform.position, 1);
    }
}
 ワイヤーの球体の表示
使用例
例えばAIの循環ルートを設定するときやキャラクターの立ち位置を設定したり、ワープポイントの設定などに便利だ。
今ならDrawWireSphereを使ったほうが良いとは思いますが、私の使用例を載せておきます。
AIの循環ルートを表示するスクリプトです。
    public class PatrolEnemy : MonoBehaviour
    {
        public Vector3[] points;
        private int destPoint = 0;
        private NavMeshAgent agent;


        private void Start () {
            agent = GetComponent<NavMeshAgent>();
            agent.autoBraking = false;

            GotoNextPoint();

            this.UpdateAsObservable()
                .Where(_ => (agent!= null && !agent.pathPending && agent.remainingDistance < 0.5f)) //次の目的地への距離が0.5fより小さくなったら
                .Subscribe(_=>GotoNextPoint()).AddTo(gameObject);   //次のポイントへ
        }


        private void OnDrawGizmos() {
            foreach (var pos in points) {
                Gizmos.color = new Color(1,1,0,0.7f);
                Gizmos.DrawSphere(pos,0.2f);
            }

            for (var i = 0; i < points.Length-1; i++) {
                Gizmos.color = new Color(0,0,1,0.7f);
                Gizmos.DrawLine(points[i],points[i+1]);
            }
            Gizmos.DrawLine(points[points.Length-1],points[0]);
        }
        private void GotoNextPoint() {
            // 地点がなにも設定されていないときに返します
            if (points.Length == 0)
                return;

            // エージェントが現在設定された目標地点に行くように設定します
            agent.destination = points[destPoint];

            // 配列内の次の位置を目標地点に設定し、
            // 必要ならば出発地点にもどります
            destPoint = (destPoint + 1) % points.Length;
        }

    }
実際に表示するとこんな感じ。

あわせて使うと良いもの
Handles
3D GUI の制御と描画のカスタマイズを行うクラスなのですが、文字情報や調整に便利。
public class ShowHandle : MonoBehaviour
{
#if UNITY_EDITOR
    private void OnDrawGizmos()
    {
        Handles.Label(transform.position, "これは虚無です");
    }
#endif
}

もちろんUnityおなじみの各種ハンドルも表示できるがラベル表示ができるのはありがたい。
まとめ
以上、UnityでGizmosを使ってみようでした。
大きなステージを作る際や、デバッグに便利なのでぜひ利用してみてください。
明日はそらたまさんによる 自己紹介と今年の振り返りです。
お楽しみに。